
Nowadays it is easy to build HTTP services using ASP.NET Core Web API framework. It is popular as it reaches browsers and mobile devices and is light-weight. To store data we will use SQLite and Entity Framework Core.
Entity Framework is an open-source ORM framework for .NET applications supported by Microsoft. It enables developers to work with data using objects of domain specific classes without focusing on the underlying database tables and columns where this data is stored.
SQLite is a relational database management system (RDBMS) contained in a C library. In contrast to many other database management systems, SQLite is not a client–server database engine. Rather, it is embedded into the end program and consequently it is really light in educational projects.
For this purpose we will create an ASP.NET Core Web API project and expose two API endpoints to be able to make a GET request and a POST request. The POST will “feed” our database with new messages and the GET will allow us to read all the saved data.
At the following link you can find the GitHub repository that contains the full version of the project that will be created and illustrated:
https://github.com/antonespo/ChatDemoServer
Installing prerequisites
In order to build this project, we need to install the following softwares:
Once you have installed VS Code, it is kindly suggested to install the following Extensions via VS Code:
STEP 1: Create ASP.NET Core Project
Let’s start creating a folder named ChatDemo (or the name you prefer) to store our application files. Then, open the created folder using VS Code.
Open the VS Code terminal and type the following command to automatically create an API project and the configuration files, based on the specified template.
For more info, visit: https://docs.microsoft.com/en-us/dotnet/core/tools/dotnet-new
dotnet new webapi -n ChatDemoLet’s add the solution file using the following command in VS Code terminal:
dotnet new sln The dotnet sln command provides a convenient way to list and modify projects in a solution file, so we can add the project to the solution using the following command in VS Code terminal:
dotnet sln [<SOLUTION_FILE>] add [<PROJECT_NAME>]In our case this command will be:
dotnet sln ChatApp.sln add server/ChatDemo.csprojTo check if the project has been added use the following command to list all the project in the solution:
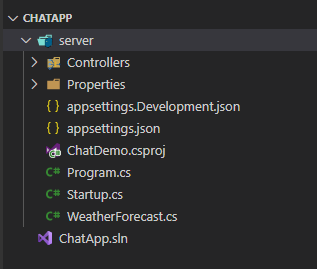
dotnet sln listAt the end of this section you will have a file and folder structure similar to this:
STEP 2: Setting Up Entity and SQLite Database using Entity Framework Core
Packages to install
Before starting to edit our project, it is recommended to close and reopen VS Code and navigate to the project folder or alternatively run OmniSharp: Restart OmniSharp using the Command Palette (Ctrl+Shift+P, or F1 on Windows).
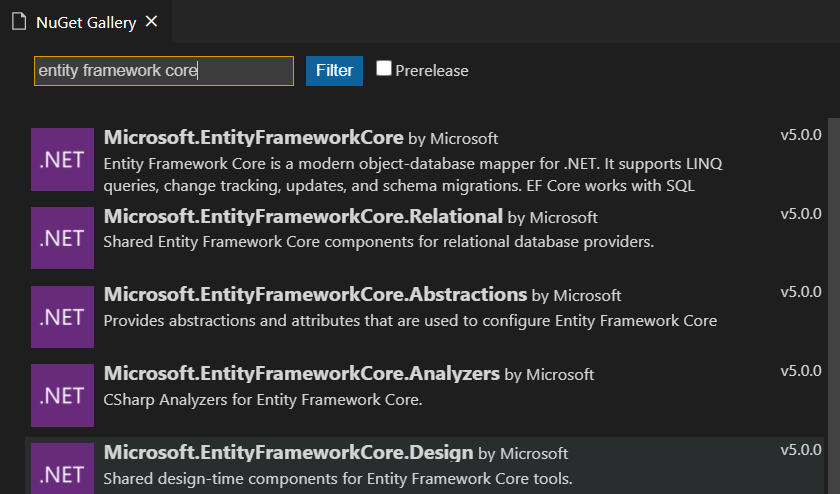
Then, open the Command Palette and search NuGet Gallery in order to install the following packages:
- Microsoft.EntityFrameworkCore
- Microsoft.EntityFrameworkCore.Tools
- Microsoft.EntityFrameworkCore.Sqlite
Hands-on the code
Now, we are ready to work on the code! Firstly, we have to delete WeatherForecast.cs and WeatherForecastController.cs in Controllers folder. These files come from the .NET CLI templates we have used to create the project.
Create a Message.cs file with the following code:
using System;
namespace ChatDemo
{
    public class Message
    {
        public int Id { get; set; }
        public DateTime CreatedAt { get; set; }
        public string Name { get; set; }
        public string Text { get; set; }
    }
}
In this project we are going to use Code-First approach. Code-First is mainly useful in Domain Driven Design. In the Code-First approach, you focus on the domain of your application and start creating classes for your domain entity rather than design your database first and then create the classes which match your database design.
So, let’s create the DataContext.cs file with the following code:
using Microsoft.EntityFrameworkCore;
using System;
using System.Collections.Generic;
using System.Linq;
using System.Threading.Tasks;
namespace ChatDemo
{
    public class DataContext : DbContext
    {
        public DataContext(DbContextOptions options) : base(options)
        {
        }
        public DbSet<Message> Messages { get; set; }
    }
}
In Startup.cs add the folling services to the container using the ConfigureServices method. The order does not matter.
services.AddTransient<DataContext> ();
services.AddDbContext<DataContext> (opt => {
    opt.UseSqlite (Configuration.GetConnectionString ("DefaultConnection"));
});
In appsettings.json, add the following connection string, this string contains the name of the data source that is being connected to our application:
"ConnectionStrings": {
    "DefaultConnection": "Data source=chatDemo.db"
 }
Now we are ready to create setting up Entity Framework. Use the following command to work with EntityFramework using VS Code terminal. The first step is to install globally EF, then we have to create our first migration. Once migrations have been created, you may also want to apply to the local database these changes and we can use the last reported command.
dotnet tool install --global dotnet-ef # install globally ef
dotnet ef migrations add MigrationName # create new migration
dotnet ef migrations remove # remove last migration
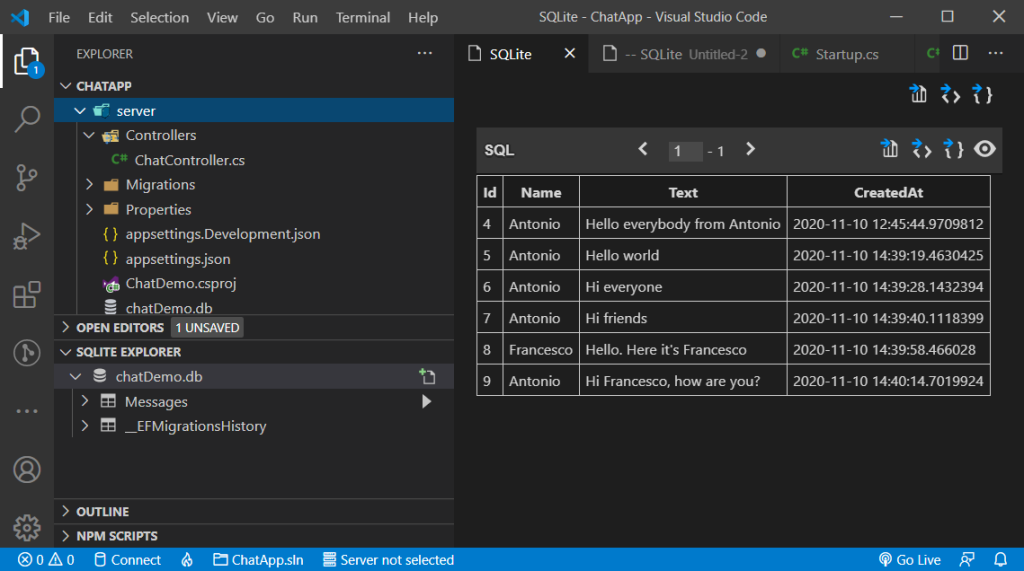
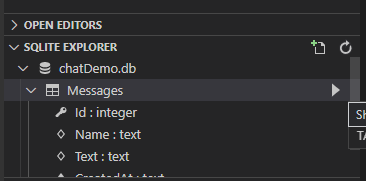
dotnet ef database update # apply migration to databaseTo explore the database created, open the Command Palette and type SQLite: Open Database. This extension makes it easy to query SQLite databases and view results in a table.
STEP 3: Create Controller to Handle HTTP Requests
In this section, we are going to create a simple controller. A Web API Controller handles incoming HTTP requests and send response back to the caller.
Web API controller is a class which can be created under the Controllers folder or any other folder under your project’s root folder. The name of a controller class must end with “Controller” and it must be derived from Microsoft.AspNetCore.Mvc.ControllerBase class. All the public methods of the controller are called action methods.
Create the ChatController.cs C# class as follow in the Controllers folder:
using System;
using System.Collections.Generic;
using System.Linq;
using ChatDemo;
using Microsoft.AspNetCore.Mvc;
namespace server.Controllers {
    [ApiController]
    [Route ("[controller]")]
    public class ChatController : ControllerBase {
        private readonly DataContext _context;
        public ChatController (DataContext context) {
            this._context = context;
        }
        [HttpGet("all")]
        public List<Message> Get(){
            return _context.Messages.ToList();
        }
        [HttpPost("new")]
        public bool Post (Message message){
            message.CreatedAt = DateTime.Now;
            _context.Messages.Add(message);
            var success = _context.SaveChanges() > 0;
            return success;
        }
    }
}
Browser security prevents a web page from making requests to a different domain than the one that served the web page. This restriction is called the same-origin policy. The same-origin policy prevents a malicious site from reading sensitive data from another site.
In order to avoid clients to make HTTP requests we are going to create a policy in the Startup class to allow any origin, any method and any header to make request. Allows CORS requests from all origins is insecure because any website can make cross-origin requests to the app. To do this, we have to add the following code in the ConfigureServices in the Startup.cs file:
services.AddCors(opt=>{
    opt.AddPolicy("CorsPolicy", policy =>{
        policy
        .AllowAnyOrigin()
        .AllowAnyMethod()
        .AllowAnyHeader();
    });
});
Finally we have to add the policy in the pipeline (in Configure method) to apply the CORS policy to all controller endpoints.
if (env.IsDevelopment ()) {
    app.UseDeveloperExceptionPage ();
}
app.UseHttpsRedirection ();
app.UseRouting ();
app.UseCors("CorsPolicy");
app.UseAuthorization ();
app.UseEndpoints (endpoints => {
    endpoints.MapControllers ();
});
STEP 4: Test API Endpoints with ReqBin.com
We have several tools to test the API, Postman and Reqbin are two of these.
Some of the features offered by Postman are:
- Compact layout
- HTTP requests with file upload support
- Formatted API responses for JSON and XML
On the other hand, Reqbin provides the following key features:
- Post requests directly from your browser
- No desktop app needed
- Share and discuss requests online
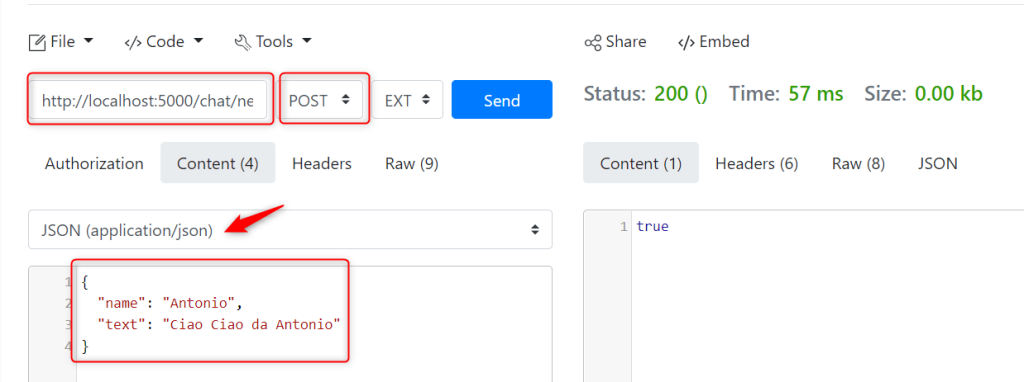
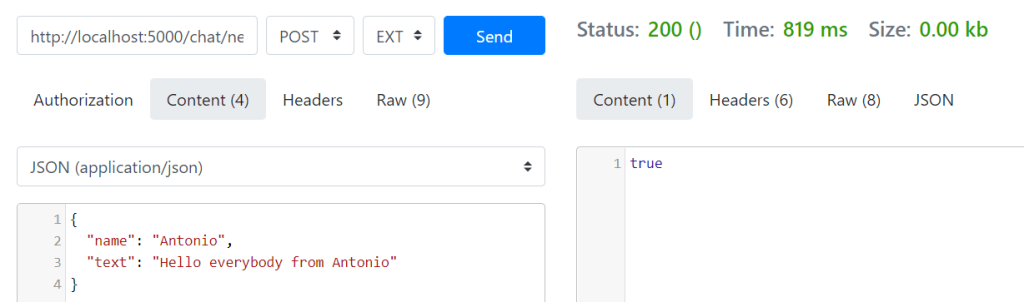
In this tutorial we will use ReqBin.com because it is very easy to use and we don’t need to install any new software.
Firstly we have to open the link ReqBin.com and install the required Chrome Extension. Once finished, we just need to insert the API endpoint, the type of the request (GET, POST, PUT, DELETE..) and, in case we need to insert a content, we can click the Content button and select JSON from the dropdown list. Finally we have to type our content and press Send to send the request. The response will be shown on the right hand side.
Back in VS Code, we have to run our application and we can type the following command in VS Code shell. Please, change your current directory and navigate into the server folder.
dotnet watch runIn the terminal we have to see something similar to the following:

Now our application is running and we are ready to test our API endpoints.
In the POST request we have to write two properties: name and text. We use Json format to send this message. The response will be a bool that returns true if the message has been saved in the database and false if not.
Finally, the GET request will return all the messages saved in the database.
